Fly Recipe: Murdich Minnow

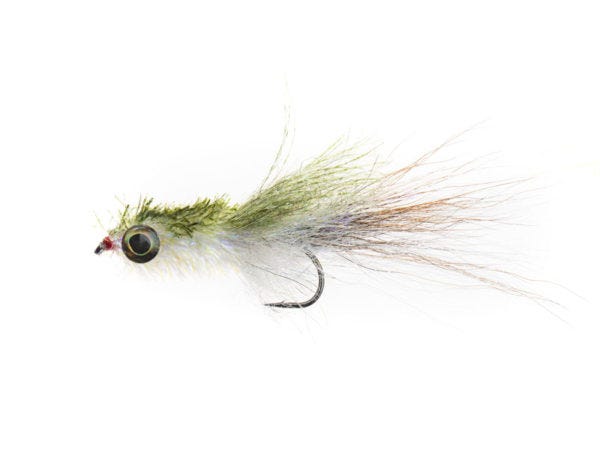
Murdich Minnow
By far my favorite smallmouth bass pattern, Murdich’s Minnow can also be utilized for trout fishing, as well as in the saltwater scene. This pattern moves in the water just like a wounded baitfish, kicking back and forth in the water with each strip of the line. Tied on a universal platform, mixing up your colors is a must, and you can find yourself imitating many different forage species.
Material List:
Hook: Gamakatsu S11-4L2H #2 (4x Long, 2x Heavy)
Thread: Veevus Power Thread 140, White
Tail: Spirit River UV2 White Bucktail
Flash: MFC UV Pearl Kreelex Flash
Kicker/Veil: EP Streamer Brush, White
Body: Spirit River Estaz, UV White
Eyes: Flymen's Fish-Skull Living Eyes Earth 7.0mm
Color: Prisimatic Permanent Craft Marker
Video Transcription
Intro to the Murdich Minnow
I'm Taylor Hess with North 40 Fly Shop in Ponderay, Idaho. Today we're going to be tying the Murdich Minnow. Although it's an older pattern, it's still used widely for trout and smallmouth bass alike. For everybody that's looking for a great crossover pattern, get geared up, we're going to have another fun tie.
Step-by-Step Tying Instructions
All right, to start the Murdich Minnow, we're going to use a Veevus 140 Power Thread. I really like using these heavier threads for big streamers. We're going to dress back to the barb. We're going to take a pretty decent section of bucktail. I'm going to comb it all out. We're going to take this clump, clean it. We're going to make that roughly two times the length of the shank of the hook. I'm going to take all those bucktail fibers, and I want to bury them. I use this to bulk up the body. You also get some really nice tight wraps on there. It really locks in that bucktail.
Now we're going to take our UV pearl Kreelex flash. I'm only going to use a few strands. After the bucktail is tied in, we're going to take a few strands of our UV Kreelex flash. I'm just going to double it back over itself along the top of the tail. I'm going to trim about the length of the tail.
Then we're going to take our EP craft fur brush. This is going to be our kicker or veil. This is going to act as a rudder for the fly. It's going to really help give it some movement. I'm going to take my thread to about halfway up the shank of the hook. I'm just going to palmer that forward. I want it heavy, but I don't want it too heavy, so I'm not going to make touching wraps. I'm just going to palmer all of that material backwards. Really helps keep the fibers from getting buried under the brush itself. Also gives some directionality to those fibers. After the fly's done you can go through and comb it if you would like. Here I'm going to make a couple hard cinching wraps over the top. Then again in front. This is going to lock that stem in. You should just be able to helicopter that off. I don't like cutting wire with my scissors. Can definitely dent them up. You really don't want that.
Once that's tied in we're going to take another section of our Kreelex flash. Same color, the UV pearl. I'm going to tie in a little bit of a wing up over top. Just straight on the top again. I'm going to try and find all those fibers. Trim them just a little bit longer than the veil itself.
Now we're ready to put the head of the fly in, but first, we need to take lead wire. I like to weight this pattern. I'm going to take .020, I'm going to wrap this wire almost the whole way to the eye of the fly. Again this helps to bulk up the body a little bit. I like to put a little bit of UV on there, just to keep everything in place. I let it soak into that wire. I like using the Loon Flow. It's some good stuff. UV's definitely the name of the game nowadays.
All right. Now we're ready to tie in our Estaz, which is going to be the body or the head of the fly. I'm going to take a pretty nice strand because I use a pretty good amount of it. When I tie this in, I'm going to tie it in with a little bit of a tag facing forward. Then again, I'm going to use this to bulk up the body a little bit. It also lets me wrap over that lead wire. It looks kind of messy, but it'll all turn out.
All right. Now we're ready to take that Estaz and pull it up ahead. Make sure you take your thread up to the eye. I like to pull all those fibers back as I wrap forward. I like to tie this head pretty thick, so I'm making these wraps touch. I'm going to wrap that almost the whole way to the eye. Make some hard cinching wraps over the top. Then pull everything back. Then you can make a nice head. This helps keep some of those fibers from getting in the eye. All right. Now we have the head of the fly. We can go ahead and whip finish. All right.
Now we're ready to put our eyes on. I'm going to be using Fish-Skull Living Eyes in the earth color. I really like these eyes. They have a good holographic tone. Just use a dot of Super Glue on the back. I like to place them pretty far forward. As close to the middle of the fly as possible. I really push down hard. Try to get it to bond to the core. I'm going to do the same on the other side. Try to get them to line up. All right.
Now that the eyes are on there, you can leave it as is if you want a plain white streamer. I'm just going to take an olive marker. I'm just going to give it a little bit of color. You can actually take this back along the entire back of the fly. It just gives it a little bit of that contrast.
There you have it. That's a Murdich Minnow. It's a great pattern for smallmouth. That's what I've always used it for but I know a lot of people really like it for trout as well. It's definitely a killer pattern.
You can find all these materials at any one of the North 40 Fly Shops so feel free to come in and see us. Ask us about the Murdich Minnow. Hopefully, you have some success with it. Thanks for watching guys. See us next time.
If you have any further questions on fly tying, please come visit us at any of our retail locations or North40.com.
Want to fool a fish on a fly you've created? Learn more fly tying recipes here.