Fly Recipe: Pale Morning Dun Bunny Dun Fly
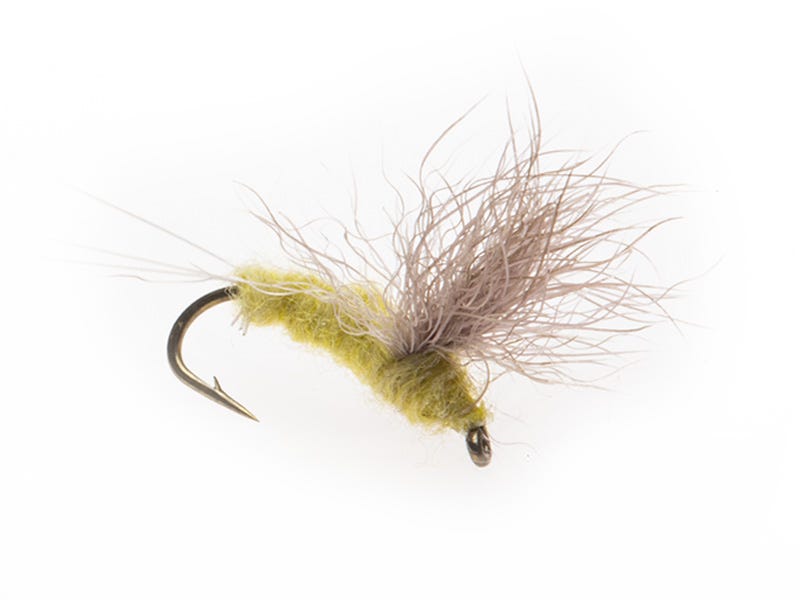

Pale Morning Dun Bunny Dun Fly
Since I started tying my small comparadun or sparkle dun style flies, I have been on a quest. They are not an overly complex fly, but the crux is the wing. Finding the perfect comparadun hair can be difficult. Too long of a hair, doesn't look quite right or too stiff of hair... the same thing. It can be a challenge making the wing look, just right. So, when someone showed me you could use snowshoe rabbit’s foot, I was impressed, to say the least. This fly comes in all the cool dyed colors. It compresses very small when you tie it in, and the best part is that it floats amazingly well. I'd say it rivals CDC. So, once I was shown this material, I started tying a lot of my small mayfly patterns with it. What I also like about it, is that it seems to shed water very quickly when you cast it. The last thing you want your dry fly doing is collecting water. Give this one a try next time you’re out. You’ll be impressed with the outcome.
Material List:
Hook: Umpqua U Series U002 Dry Fly Hook (Size 16)
Wing: Snowshoe Rabbit Foot (Medium Dun)
Thread: UTC Ultra Thread Hopper Yellow (140)
Body: Wapsi Super Fine Dubbing (Pale Morning Dun)
Tail: Umpqua's Betts Tailing Fibers (Cream)
Video Transcription
Intro to the Pale Morning Dun Bunny Dun Fly
Hey guys, Tyler at North 40 Fly Shop in Coeur d'Alene. Today we're going to tie the Snowshoe Rabbit Hair Dun or Bunny Dun, as I'll call it. It's a take on a old school pattern by Craig Matthews, the Comparadun, or there's the Sparkle Dun. I'm sure a lot of you guys know that fly. Real simple fly, there's not a lot to it, but tying it with the original style with the deer hair can be challenging. It's a really, really effective fly, very basic, like I said, but it can be a little bit difficult to tie with deer hair.
Kind of been a quest of mine over my fly tying career of the perfect Sparkle Dun or Comparadun hair, so I started playing around when this snowshoe rabbit hair or snowshoe rabbit foot came out. A lot of guys started tying some smaller spring freaky type dry flies with it. Since I started playing with it, I absolutely love it for small flight wings. I'll use it for wings, or you can actually dub with it, too. It compresses really well. It floats extremely well. I'd probably say just as good as CDC does and has a good look to it, too. You can get it in different colors. It's a wicked, wicked little fly.
What I like about it a lot, when you go to cast the fly, it sheds water very quickly. Rarely, I'll dress the fly with some floating in the morning, catch two or three fish with it, and it's still going. It's really, really impressed me on how well this stuff floats. So, you should give it a try, and we'll tie it for you here. Thank you.
Step-by-Step Tying Instructions
We'll start out with uni thread in a pale morning dun color or a light Cahill, and we're doing it on a size 16 here, so let's get into it. First off, I'm going to tie in at the midway point here. It's pretty important, guys, when you're doing these little flies, if you're new to tying smaller flies, don't over wrap. That's one of the big things or big mistakes in tying smaller flies. Guys get really carried away with over wrapping. Thread size is important, too. I'm using 6/0 on this. I could use 8/0 but I feel comfortable with with using 6/0. But, when you guys get down into the 18s or 20s, you're most likely going to have to start using 8/0 or something smaller than that.
So, once you get tied in, you're at the midway point here. We're going to get a chunk of our rabbit's foot here. We don't need a lot, and we're going to make sure we cut down right at the base of the fur here. Then, we're going to prep the hair before we tie it in. So, I'm gonna clean out, just like you would on a patch of deer hair or something like that. You're going to get rid of some of the underfur and that's going to help it compress a little bit.
So, got what I want here, and we're going to tie with the tips forward. So, we're going to tie in right here, a few wraps, three or four wraps, and then we're going to cut an angle downward like so. Trim it up a bit, and then we're going to tie down the butt ends here. Then we're going to post up the wing. So, pull your wing back, stack a bunch of thread wraps in front. We're creating a little bit of a taper here as well, guys, if you can notice what I'm doing there and get that wing to stand up nice and tall.
Next, we're going to do our tail, so this is Umpqua's microfibbets, or their tailing fibers. I'm going to try and select out. They're tiny, so this can take a little bit of practice here. We're going to try and get four here, two on each side. The tail is going to be about the hook shank length, so pre-measure, see what you want there, trim off your excess ahead of time. Come in behind the wing. Tie it right there, and then walk it back. First thing I do here, once I get it tied down, is I'm going to lift that tailing material up, and wrap a thread right behind it, and that's going to stand those fibers up. If you can, we're going to split two off to one side and two off to the other. Again, this is a little tiny fly, so if you need some good eyes to do it, might get a magnifying glass or something like that. Then, we're good to go there.
Okay, next is our dubbing. This is Pale Morning Dun color. This is fine and dry. This stuff's awesome. It's a polypropylene based dubbing, floats really, really well. You can just get a little tiny wisp going on there. You don't need big bulky dubbing here, guys. We want a real fine amount on there. We're not trying to build up. We're almost just trying to color the body in. Okay, so start with about that much, maybe about two and a half, three inches worth. Get it prepped on there. Again, we're going to try and get a little wrap in between the fibers there. I'm going to get my other tail out here. He's kind of stuck. There we go. Right in between them there, and now we're going to start wrapping forward, nice and easy, coming forward right behind the wing.
We don't really want the wing to fold forward so you don't really want to dub too close to that wing. Then, lock it in front. What we do want to do though is to stand it upright. There we go, that's looking good, and just a touch more. One little trick to this dubbing, guys, start with a little bit and add as you go if you need to. It's hard to take it off. We'll finish it off there.
This fly is very basic, pretty simple little fly, but that's the gist of it. We're going to tie it off. You guys can whip finish, half hitch, whatever you want to do. Trim, then I'll come through and spread the wing out just a little bit, sometimes helps by just pushing your thumb for rearward on the wing, good. Simple little fly, but man this thing fishes great. Then, we'll get a touch of head cement there, and that's it.
Again, you guys can do all the basic Mayfly variations, Blue Wing Olive, Pale Morning Dun, March Brown, Hendrickson, Sulfur, list goes on and on. It's just a format, or a style of fly. Like I said, the old school pattern was the Comparadun or the Sparkle Dun. The only difference is the tail. The Comparadun has the microfibbets, and then the the Sparkle Dun has the Antron for the tail, almost like a trailing shuck. Finicky spring creek trout, or fish that have been pressured, this is a good one. This is a really, really good fly. Love it. Anyways, there you have it. There's the Pale Morning Dun with the bunny wing or Bunny Dun.
If you have any further questions on fly tying, please come visit us at any of our retail locations or North40.com.
Want to fool a fish on a fly you've created? Learn more fly tying recipes here.