Fly Recipe: Seminar Bugger

Seminar Bugger
Not sure how many years ago I came up with this pattern it was at least 2 maybe 3. I tie so many flies it's hard to remember exactly when I came up with the patterns. I do remember it was sometime around when we had a stillwater seminar here at the shop. I do remember I wanted a leech/bugger that had a relatively slender body and movement. The first lake I tried it at was Rat Lake. After a handful of fat rainbows and a couple of smaller brown trout I was very happy with the results. Since then I have tried it at just about all of our area lakes and my home river and have put this fly in the category as one of my go-to flies. As I mentioned before I came up with the name after some of the guys that went to the seminar liked it and liked it even more when I gave out a couple of dozen to them to try out. Tie it up in a number of colors just like I say in the video and I hope it does as good for you as it has for me.
Material List:
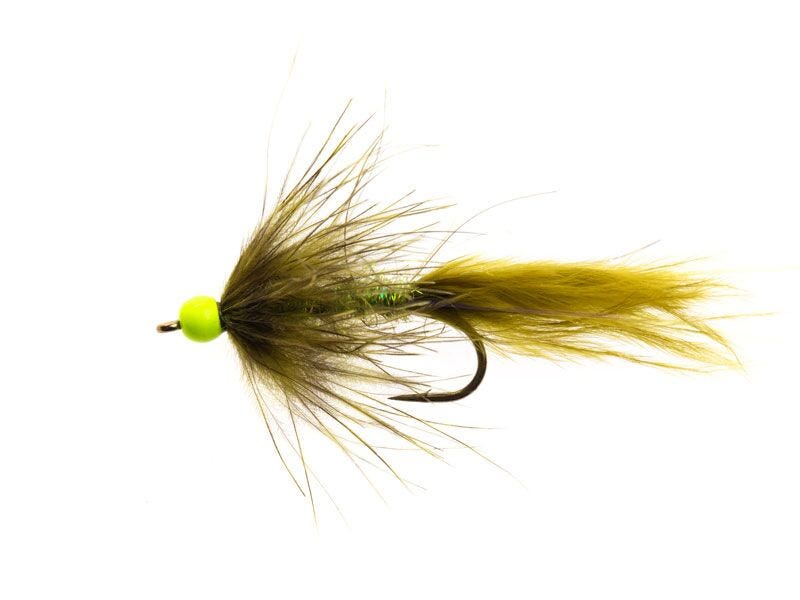
Hook: Umpqua Tiemco TMC 2312 #8
Thread: UTC 70 Olive
Bead: Hareline Brass Bead 1/8th, Chartreuse
Tail: Hareline Wooly Bugger Marabou, Olive
Flash: Wapsi Flashabou Ice Blue Pearl
Body: Hareline Hare’s Ice Dub, Olive
Hackle: Hareline Grizzly Marabou Olive or Strung Marabou, Olive
Video Transcription
Intro to the Seminar Bugger
Hi, Keith here from North 40 Fly Shop. Today, we're going to tie up a bug that I call the Seminar Bugger. How I came about with this fly was a few years ago we had a seminar on still water fishing, and I had tied this up, I don't know, a couple of months beforehand, used it on some of the area lakes and did very well.
Basically, I was showing some customers the bug at the seminar, and a lot of them liked it, which I'm prone to sometimes just throwing the bug and say, "There you go," when I have a number of them tied up. That's how I came up with the name, the Seminar Bugger. I've used it also on my home water, the Methow River. I've cast and stripped, and I've also swung it on my five-weight trout spey rod, and done real good with some of the Westslope cutthroats.
You can tie this in number of sizes, everything from a size six all the way down to a size 12, even a 14 if you want. If you need something a little bit smaller, it can imitate a number of things, and it can imitate absolutely nothing. It's the nice thing about this bug.
Color wise, you can do it in olives, burnt orange, blacks, sculpin, olive, browns, yellow. I think that's the colors that I usually tie this up in, and catch an array of different type fish. Like I said, trout and everything else that I've used it for, and bass. I've even caught panfish with it, when I've been trying to catch some of them.
It's a simple bug, there's not a whole lot to it, but it's very effective. So, let's get tying.
Step-by-Step Tying Instructions
Okay, to give you a more close up look at what we're looking at here to tie, this is it right here. So, let's get started. For the hooks, we're using a Tiemco 2312 in a size 8, just because it will make it a little bit easier for you to see. And to that we're going to put a one eighth chartreuse brass bead on it. Like such.
And we're using semi-denier ultra thread in olive.
I should point out that in the past, depending on the body of water that I'm fishing, sometime I will use flame orange or something like that, a hot thread color for a hotspot up behind the bead. If I'm using a different color like silver or gold or copper brass bead instead of the painted ones.
Okay, so for the tail we're going to use some of the Marabou from the, let's see Woolly Bugger Marabou, olive. I use a lot of this especially with leech patterns and even bugger patterns, which is what this was designed for. Except I just strip off a little bit. You don't need to make the tail real real long, we want to kind of keep it short. We're only gonna do it about a body length, maybe. Yeah.
The other thing to make this a little bit more bearable, I would suggest kind of moisten the Marabou right here, the stem part that you're gonna be tying down, it just makes it easier for you to get a hold of and keep it on top for the most part when you're wrapping it on.
That way you get a nice even wrap, keep the body at one size. There you go.
The next thing we're gonna put in is a little bit of Flashabou in the tail. And I like to use the pearl ice, what is this? Yeah, ice blue, or no. The ice blue pearl. I'll get it right. This is almost a UV quality. And we're gonna do two strands. There we go.
The other thing I do is when I match these up, before I tie 'em in, I run them across my tongue just to kind of moisten them up a little bit and they kind of hold together. Makes it a little bit easier when you're tying them in. Well it's supposed to. We'll get them tied in there one way or the other.
And you can put it in right along the side if it doesn't want to stay on the side, that's okay. As long as you got it in there. You want to trim those out to about the same length as your Marabou. Alrighty. Now we're gonna move on to the body.
So a little dubbing wax on the thread. For the body we're gonna use some Hare's Ice Dub in olive, and pretty much we're gonna run this, what I call sparse. And you're gonna wanna do a pretty tight little, some people call it a dubbing noodle. And I heard one gentlemen the other day make the comment on another video that to put it on you want to put it on so hard, when you're putting a dubbing on, that it hurts your fingers, so I kind of have to concur with that.
So the body is gonna be not very big as far a thickness. The old adage, "Less is more" does apply here. And we're just gonna keep moving that forward, and if we run out we just apply a little bit more. I'm gonna carry that all the way up to the front, there we go.
Okay, before I go too much further, I like to kind of just rough this up just a little bit. I want some of those fibers to kind of break loose and add a little bit of movement to it. So, don't get overzealous with your brushing but, put a little effort into it. Get them fibers to stick out a little bit. There we go. Alright.
So the last thing, we're going to tie in the hackle an the collar area. And for that we're gonna use the Grizzly Marabou in olive. This stuff is more like a Chickabou than actually Marabou. So you want to actually go through and pick out one that's got some good webbing because you're gonna wrap it on there like a hackle almost. So about that size. You're gonna strip off at the stem where you're gonna tie in. Get that tied in real good. There we go. There isn't any particular number of wraps, you're just gonna wrap it until it's all gone. Might wanna hold the fibers back a little when you're doing each wrap.
The other thing too is we're not gonna worry about trimming off the tip. Nice thing about this particular material is you can just keep wrapping it all the way up 'til you can't get it there anymore and then we're just going to tie it off and leave that as part of the collar, like so. Couple behind, couple in front, unhook your hackle pliers. Pull her back a little bit. Make a couple of securing more wraps. Get that thing to bend back just the way you want it. Make it look pretty. There we go. Little superglue up here.
Generally when I'm tying something behind a bead or a cone head this is how I apply my superglue. About three to four turns of the whip finish. Get her all done up there. Come on. It never goes just the way you want it. There we go. Double check to see that Flashabou is the right length.
Alright. You can see it's not a real big fly as far as volume. And that's kind of what you want, you want a real sparse fly, so.
Well there you go, that is the Seminar Bugger. Simple, effective. Tie it in different colors, tie it in different sizes. Use it in lakes, use it in rivers. Let me know how you do with it.
If you have any further questions on fly tying, please come visit us at any of our retail locations or North40.com.
Want to fool a fish on a fly you've created? Learn more fly tying recipes here.