How to Properly Tie a D Loop?

How Can Something so Small have Such a Big Impact?
Bottom line, it's less costly to replace a D Loop than a string. Watch and learn as we share our best tips and techniques for how to tie a D Loop.
Video Transcription
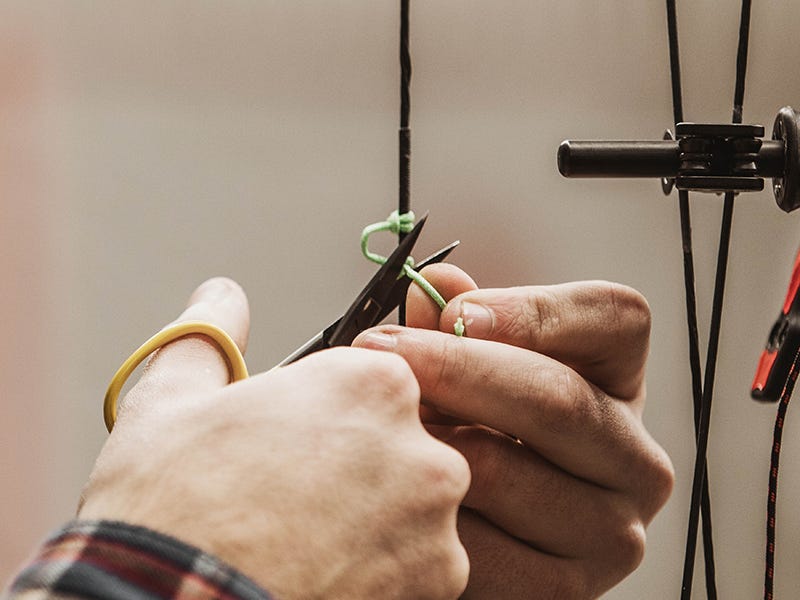
Hey guys, Ken here with North 40 Outfitters, Lead Archery Tech at our West Great Falls location. Today we're gonna talk about how to tie in your own D loop. So, with the D loop, here is an example of an incorrect way to have a D loop tied in. As you can see the knots are on the same side and what that's gonna do is it's gonna allow the D loop to just spin around the string instead of staying in the same spot. We want that D loop to be nice and solid not moving on us, so I'm gonna walk you through how to tie it in the right way.
How Much String is Needed when Tying a D Loop?
First, we'll cut this guy off. For the string, we're gonna want to make sure we give ourselves plenty of string. You shouldn't need much more than six to seven inches though. And, for our first end, we're gonna go ahead and kind of flare the tip and get it kind of opened up a little bit so it turns into a nicer ball for us. You don't want to get it too hot and let the whole thing just come on fire. If this whole ball lights on fire, it typically becomes more brittle. So, you just want to kind of, you don't want to be in a rush to get it balled up, and I personally like the look of it flattened out. You don't have to if you don't want to. So, for the first step, we're gonna bend our string about in half and we're gonna put our loop on one end and we're gonna pull our tag ends through that loop.
Gearing up? Shop all archery HERE.
Once it's down, loop around it and pull it through there fairly tight. You're not trying to tighten it too much at this point in time. Okay, and then what you're gonna want to do is instead of going this way, which is how you'd get it done the wrong way, we're gonna come across the string. So, you come across the string back through the loop that you created. Okay, you're gonna make another loop right here. You're gonna pull your tag in through there. Okay, and to get make sure we get the right size D loop. We don't want it too long. This will expand as we tighten it. We're gonna go ahead and cut off our tag in here so it's the right length. And instead of turning it like this, we're gonna go ahead and untwist it. We don't want to light it anywhere close to that string in case something terrible happens, so we'll fray this end. Also, it's really important to make sure you're replacing these and changing them out fairly regularly. You don't want these breaking on you while you're pulling your bow back. That can hurt quite a bit. I's a lot of pain for a pretty little thing, so make sure you're taking the time to check your D loop. Make sure it doesn't look too worn out, too banged up. If it does, probably good time to go ahead and replace it.
How to Rewrap a D Loop?
So, we go ahead and rewrap it exactly how we did before. Take my set of D loop pliers and send them through here. Start tying in a little bit for looks. I kind of like to pinch down around the burnt end just to kind of keep it looking nice and tight. Then you can take this set of Viper pliers just give it a little bit of squeeze. You're not trying to squeeze it too hard. You don't want to squish the string underneath there. And, there you go, you have a well-tied, correct D loop. For more questions feel free to swing by your local North 40 Outfitters, or check us out online at north40.com.